“Foraging isn’t just about what grows out of the soil—sometimes it’s about the deep history waiting right beneath our feet.”
Foragers are trained to keep our eyes on the landscape. We watch the seasons shift, looking up at the trees or down at the green things growing along the fence lines. We look at dandelions, plantain, or yarrow and see food and medicine.
Recently, I trained my eyes to look even deeper—past the plants, straight into the raw earth beneath my feet. Foraging isn’t just about the plants; it’s about the earth itself. Learning to search for wild clay brought back that familiar thrill of discovery. It’s amazing to realize that the Creator provided exactly what we need right in the landscape, totally ignored by most of the modern world, just waiting for someone to remember how to find and use it.
Beyond the craft itself, there is something beautiful about the community of it all. In our modern, rushing world, we rarely just sit. But wild pottery forces you to slow down. Hours speed by as you sit around the fire, talking, and tending the coals and flames. It is a fantastic reminder that the old ways didn’t just produce beautiful tools—they built community. It is quality time spent without the modern rush, just like people have done for thousands of years.
Reading about the past in a book pales in comparison to the tangible reality of sinking your fingers into the earth, sifting and processing through the layers to find the right balance to make your clay body, forming the vessel you desire, and then sitting by a fire, watching your raw, handmade clay from the earth turn to something completely new in the heat of the coals and flames.
The Process in a Nutshell
1. Finding Your Wild Clay
- Where to Look: Look for natural cutouts in the landscape where subsoil is exposed—creek banks, eroded hillsides, ditches, or holes left by overturned trees.
- The Test: Look past the topsoil (the dark, organic matter) until you hit the denser subsoil. Squeeze a handful of moist earth. If it holds its shape and doesn’t crumble when you poke it, you’ve likely found some clay.
2. Harvesting
- Digging: Scoop the clay into a bucket. Don’t worry about getting rocks, roots, or sand in it at this stage—the processing will take care of that.
- Variety: Take samples from a few different places if you can. Mixed clay is often better than just one type.
3. Wet Processing (Levigation)
This is the easiest traditional way to separate the pure clay from the debris:
- Dissolve and Suspend: Break the clay into small chunks, put it in a bucket, and cover it with water – 1 part clay to at least 5 parts water. Stir it vigorously (a drill mixer works great) until it looks like a thick, smooth milkshake.
- Strain: Pour the liquid slurry through a fine mesh strainer or window screen into a second bucket. The heavy rocks, roots, and large grit will stay behind in the screen, while the pure clay particles pass through suspended in the water.
- Settle: Let the strained bucket sit for at least several hours or up to a day or even longer. The heavy clay will settle to the bottom, leaving a layer of clear water on top. Siphon or pour off that excess water.
4. Drying & Wedging
- Drying: Pour the thick, pudding-like clay into a plaster bat to expedite the drying process. You can also use a canvas sheet, or even into an old pillowcase hung up to drip but you may lose some clay with those methods. Or you can just wait and allow evaporation to dry the clay, but this will take the longest.
- Wedging: Once it reaches a dough-like consistency, slam and knead the clay (like bread dough) on a hard surface to work out any trapped air bubbles.
5. Adding Temper
What it is: Pure clay shrinks drastically and will crack in a fire. To prevent this, you must mix in a temper—traditionally fine sand or old, fired pottery pieces crushed finely (grog). You can also use organic tempers such as straw/grass, seashells/eggshells, sawdust, or even manure (from herbivores). These things can also be foraged (i.e. sand can often be found in the same areas as clay and processed using sieves and water).
The Mix: Knead about 10% to 20% or sometimes up to 30% temper into your purified clay by volume. Mix in as much temper as possible while keeping the clay useable. You want your tempered clay to pass the coil test (roll the clay into a coil and wrap around your finger without cracking). This gives the clay the structural strength it needs to survive the shock of the fire. Knead it well until it is completely homogenized and passing the coil test. It is then ready for shaping.
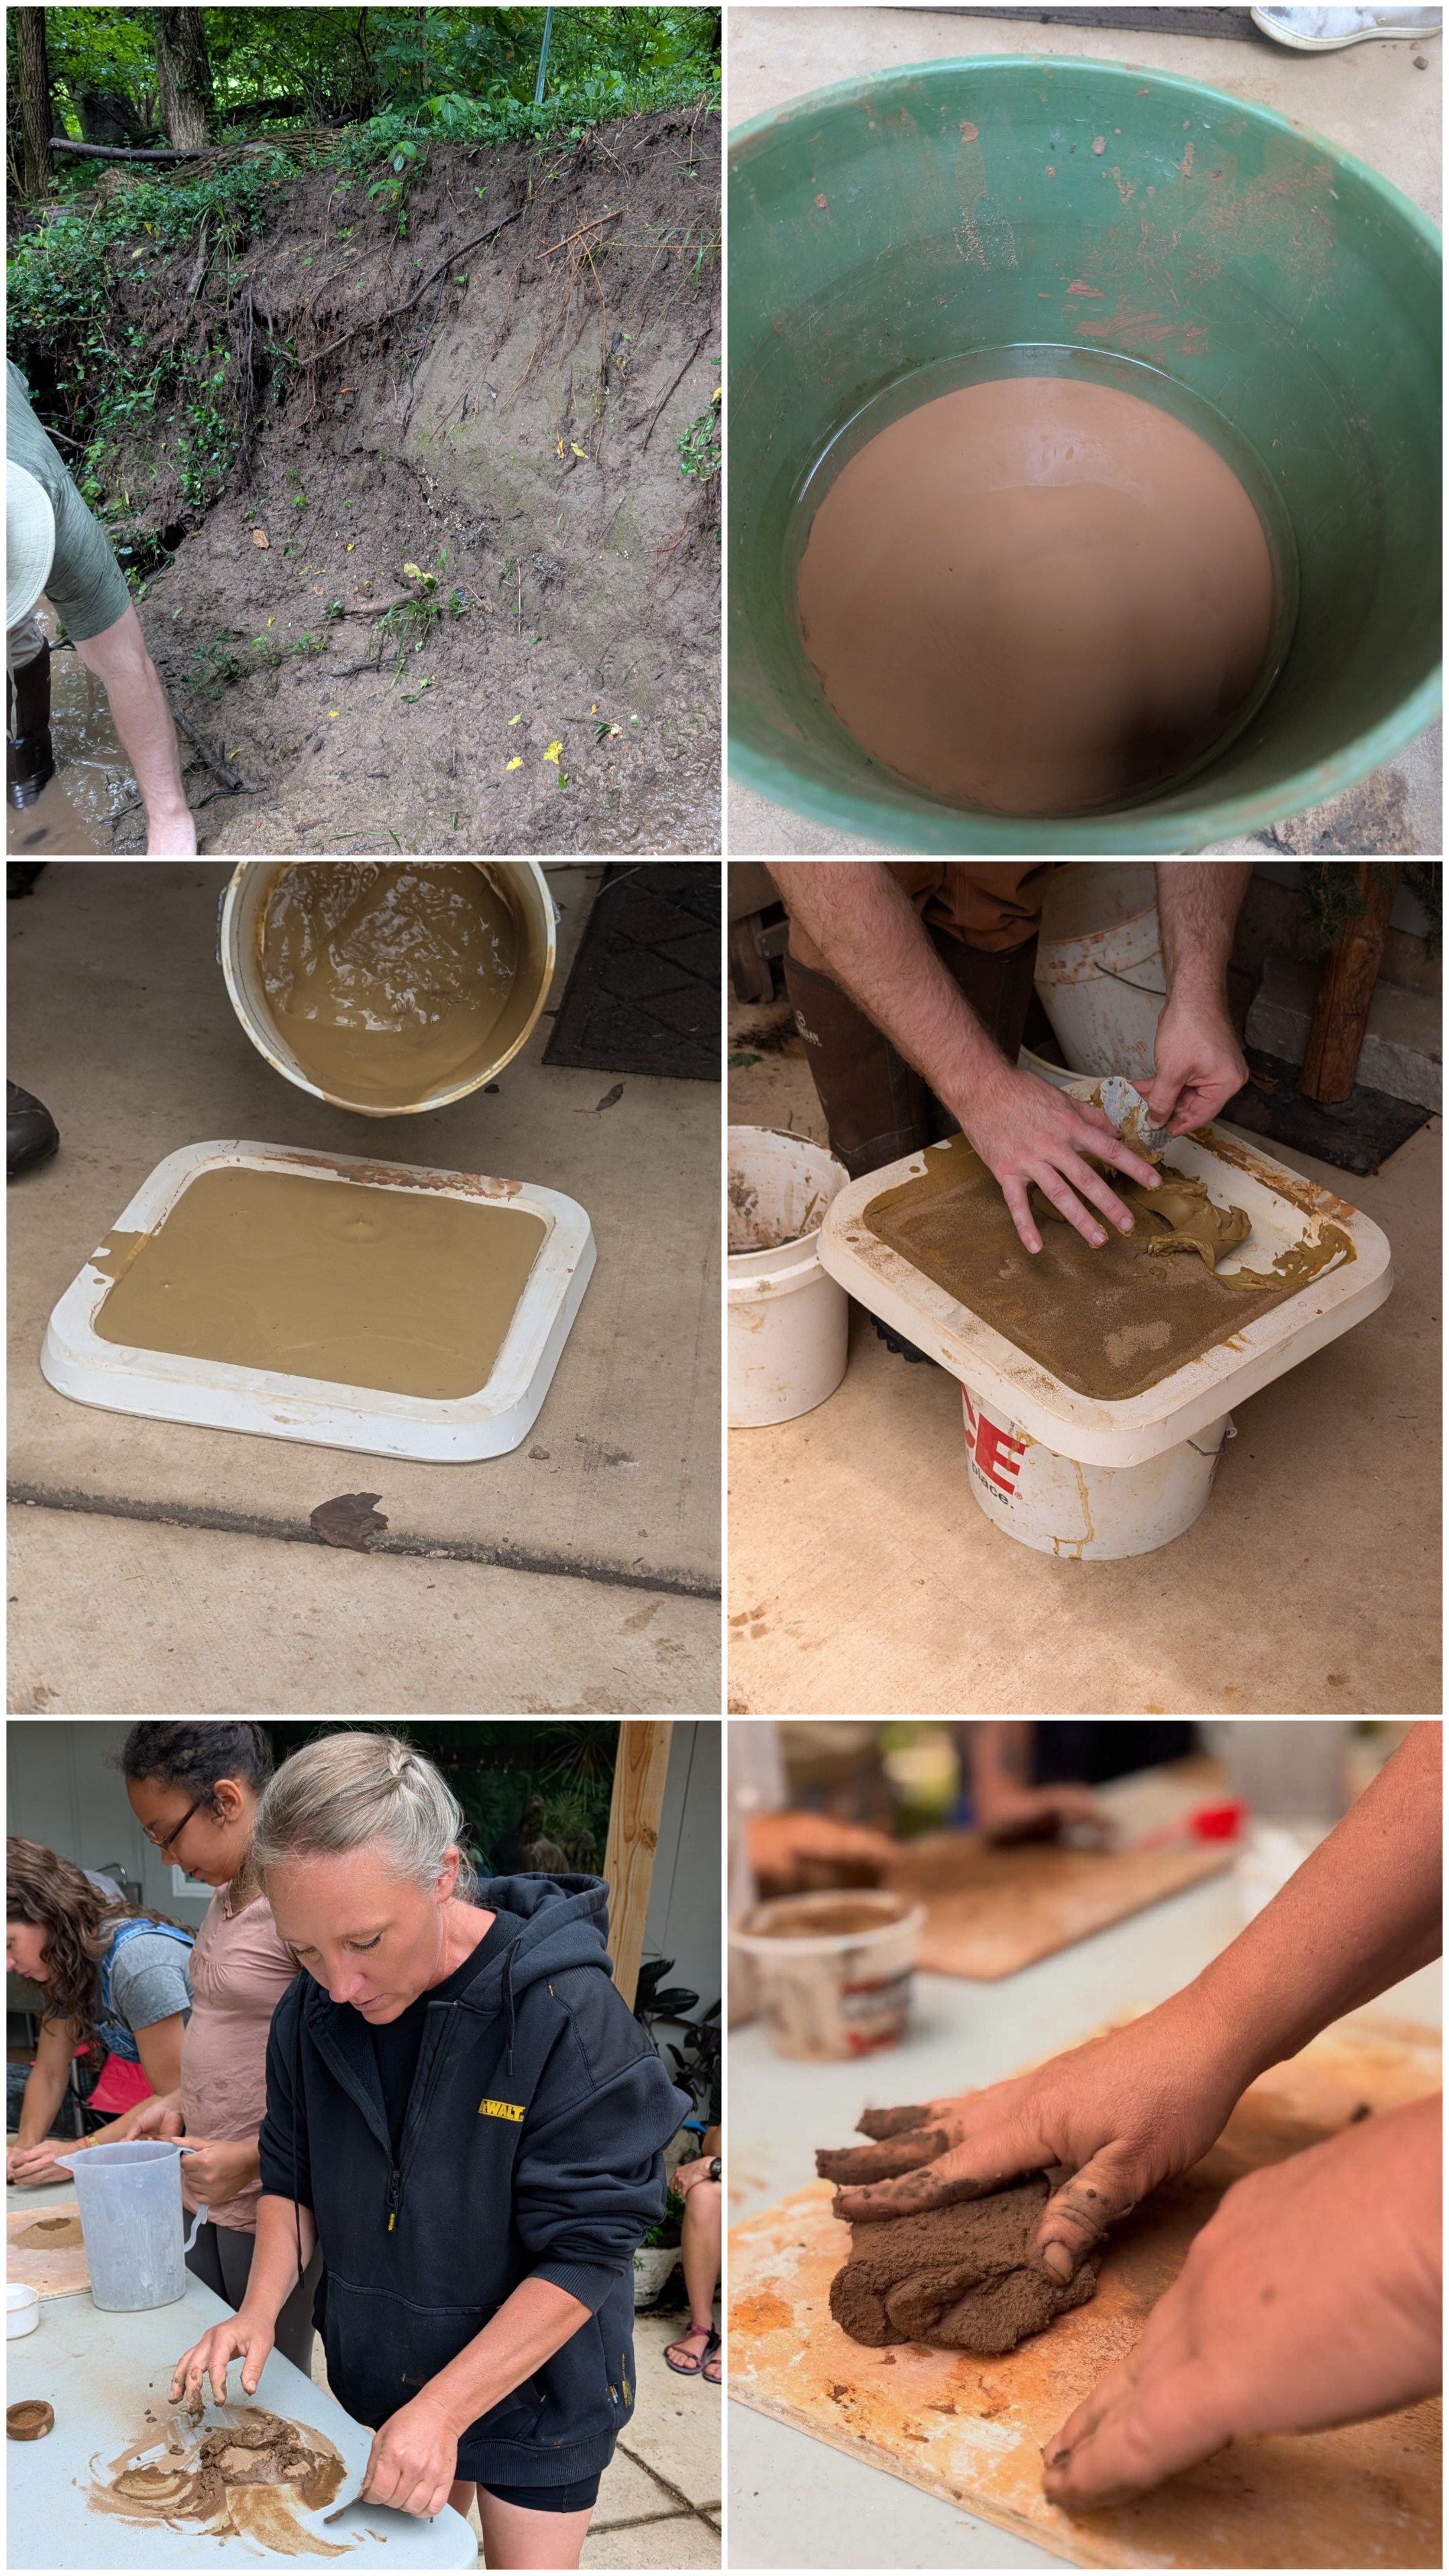
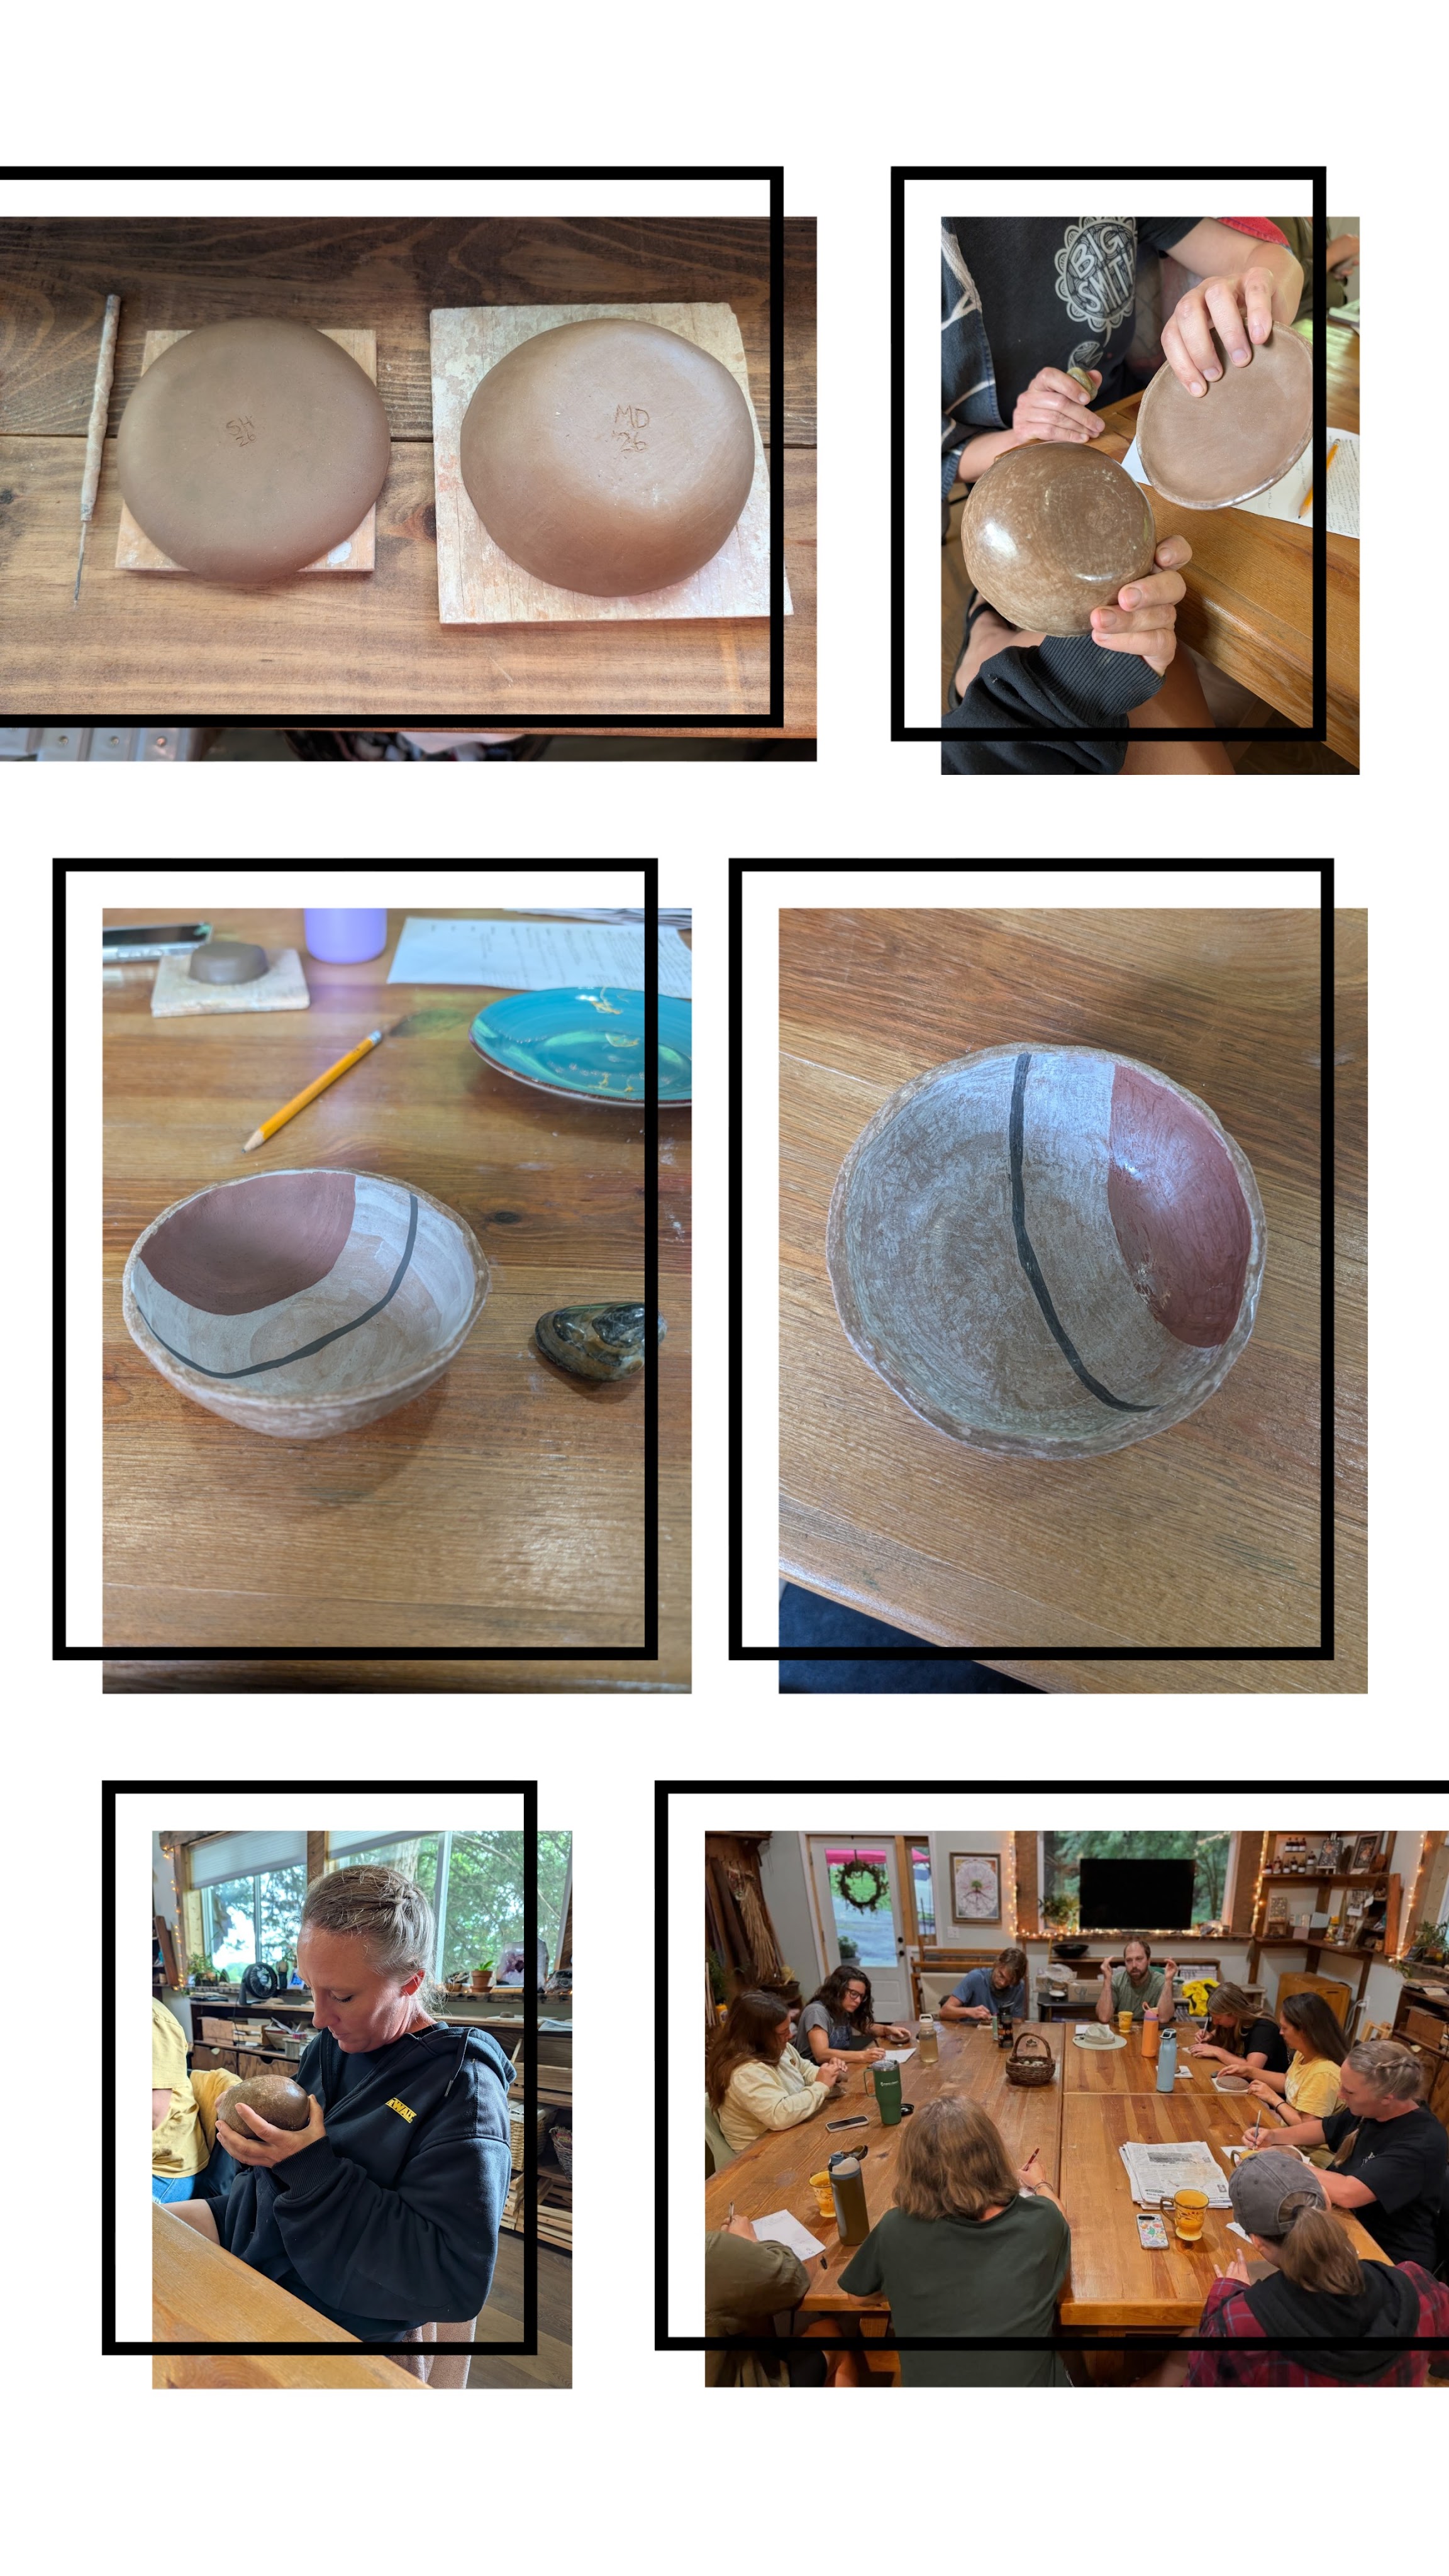
6. Shaping the Vessel (Puki Style)
- Hand-Building: Traditional puki pottery doesn’t use a potter’s wheel. Instead, it relies on ancient hand-building techniques. You can use the slab method (use a rolling pin to flatten the clay into a slab and then shape into a bowl) or the coiling method (coil the clay into a bowl shape and then scrape the sides smooth).
- Painting (optional): Traditional paints use different minerals such as iron oxide or different colors of clays diluted in water (slips) to create designs. Painting can be done once the pot is firm but not fully dry (leather-hard).
- Burnishing (optional): Once leather-hard and painted, if desired, use a smooth stone or the back of a spoon to rub the surface vigorously. This compresses the clay particles, creating a beautiful, natural sheen and making the pot more water-resistant without needing modern glaze.
7. Drying (The Critical Stage)
- Slow and Steady: This is where patience is key. If clay dries too fast, it will warp or crack. Keep the pieces out of direct sunlight and drafts. Many artisans loosely cover them with a cloth or plastic for the first few days to slow down the evaporation.
- Bone Dry: The pottery must be absolutely, 100% dry before it ever touches a flame. Any trapped moisture inside the clay walls will turn to steam during firing and cause the pot to literally explode. You know it’s ready when it feels completely room-temperature to the touch (not cool or damp) and looks chalky and pale.
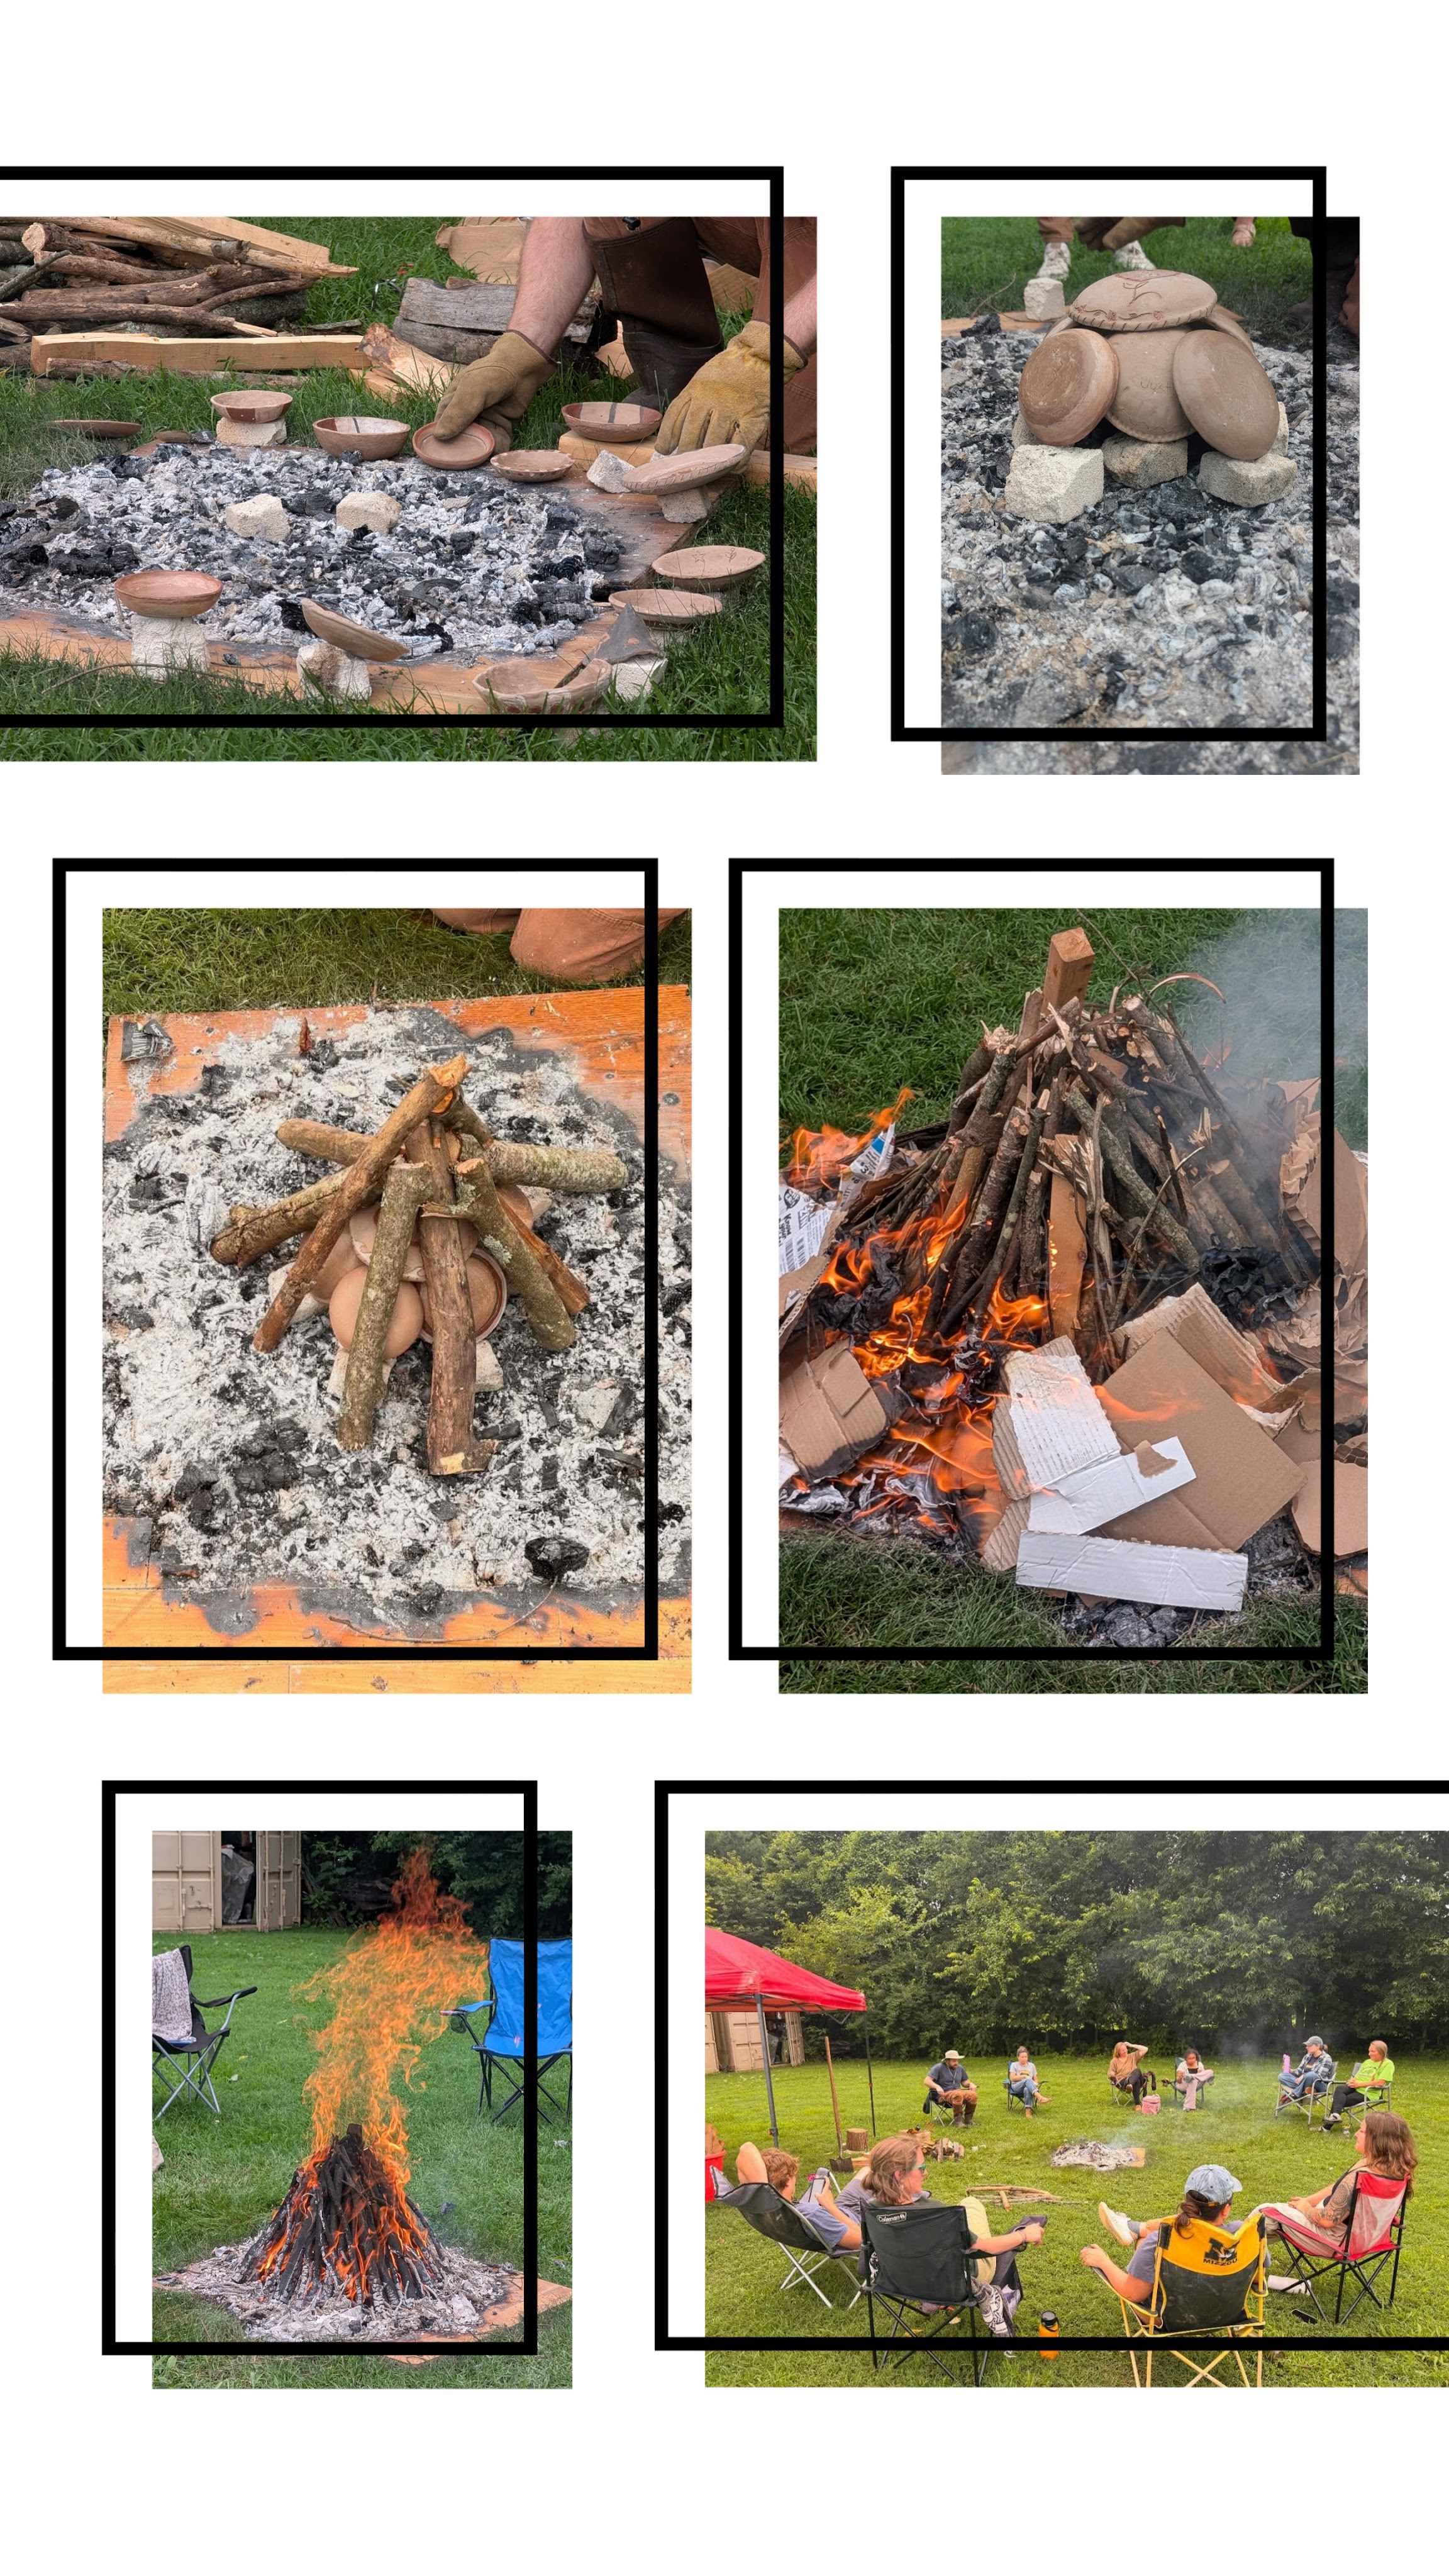
8. Firing (The Traditional Method)
- Primary Fire: Build a fire that is big enough to fit the pieces you will be firing and allow it to burn down to ashes. This will warm the ground in preparation for firing.
- Pre-Heating: To prevent thermal shock, place the bone-dry pots near the edge of your primary fire for a few hours. This gently bakes out any microscopic residual moisture and warms the clay up before the intense heat hits. Rotate the pots occasionally and gradually move them closer to the fire over time.
- Secondary Fire: Once your primary fire is down to ashes, you can carefully arrange your pottery in the middle of your primary fire ashes. Pots do best upside down and elevated on firing bricks for the best heat circulation. You will then arrange large sticks over your pottery and then pack increasingly small kindling in a teepee shape over your pottery until it is completely buried in a mound of wood and kindling. Ignite the fire if the primary coals don’t do it for you. You want the fire to burn hot and fast and evenly on all sides, creating a roaring bed of coals that wraps the pottery in intense heat. It needs to reach at least 1200*F to permanently alter the chemical structure of the clay. Add sticks as needed to keep the pottery covered until firing temperature is reached. It only needs to stay at firing temperature for about 10-15 minutes to successfully fire.
- The Cooling: Once your pieces have fired, allow the fire to die down naturally and your pottery to gradually cool before handling.
9. The Moment of Truth
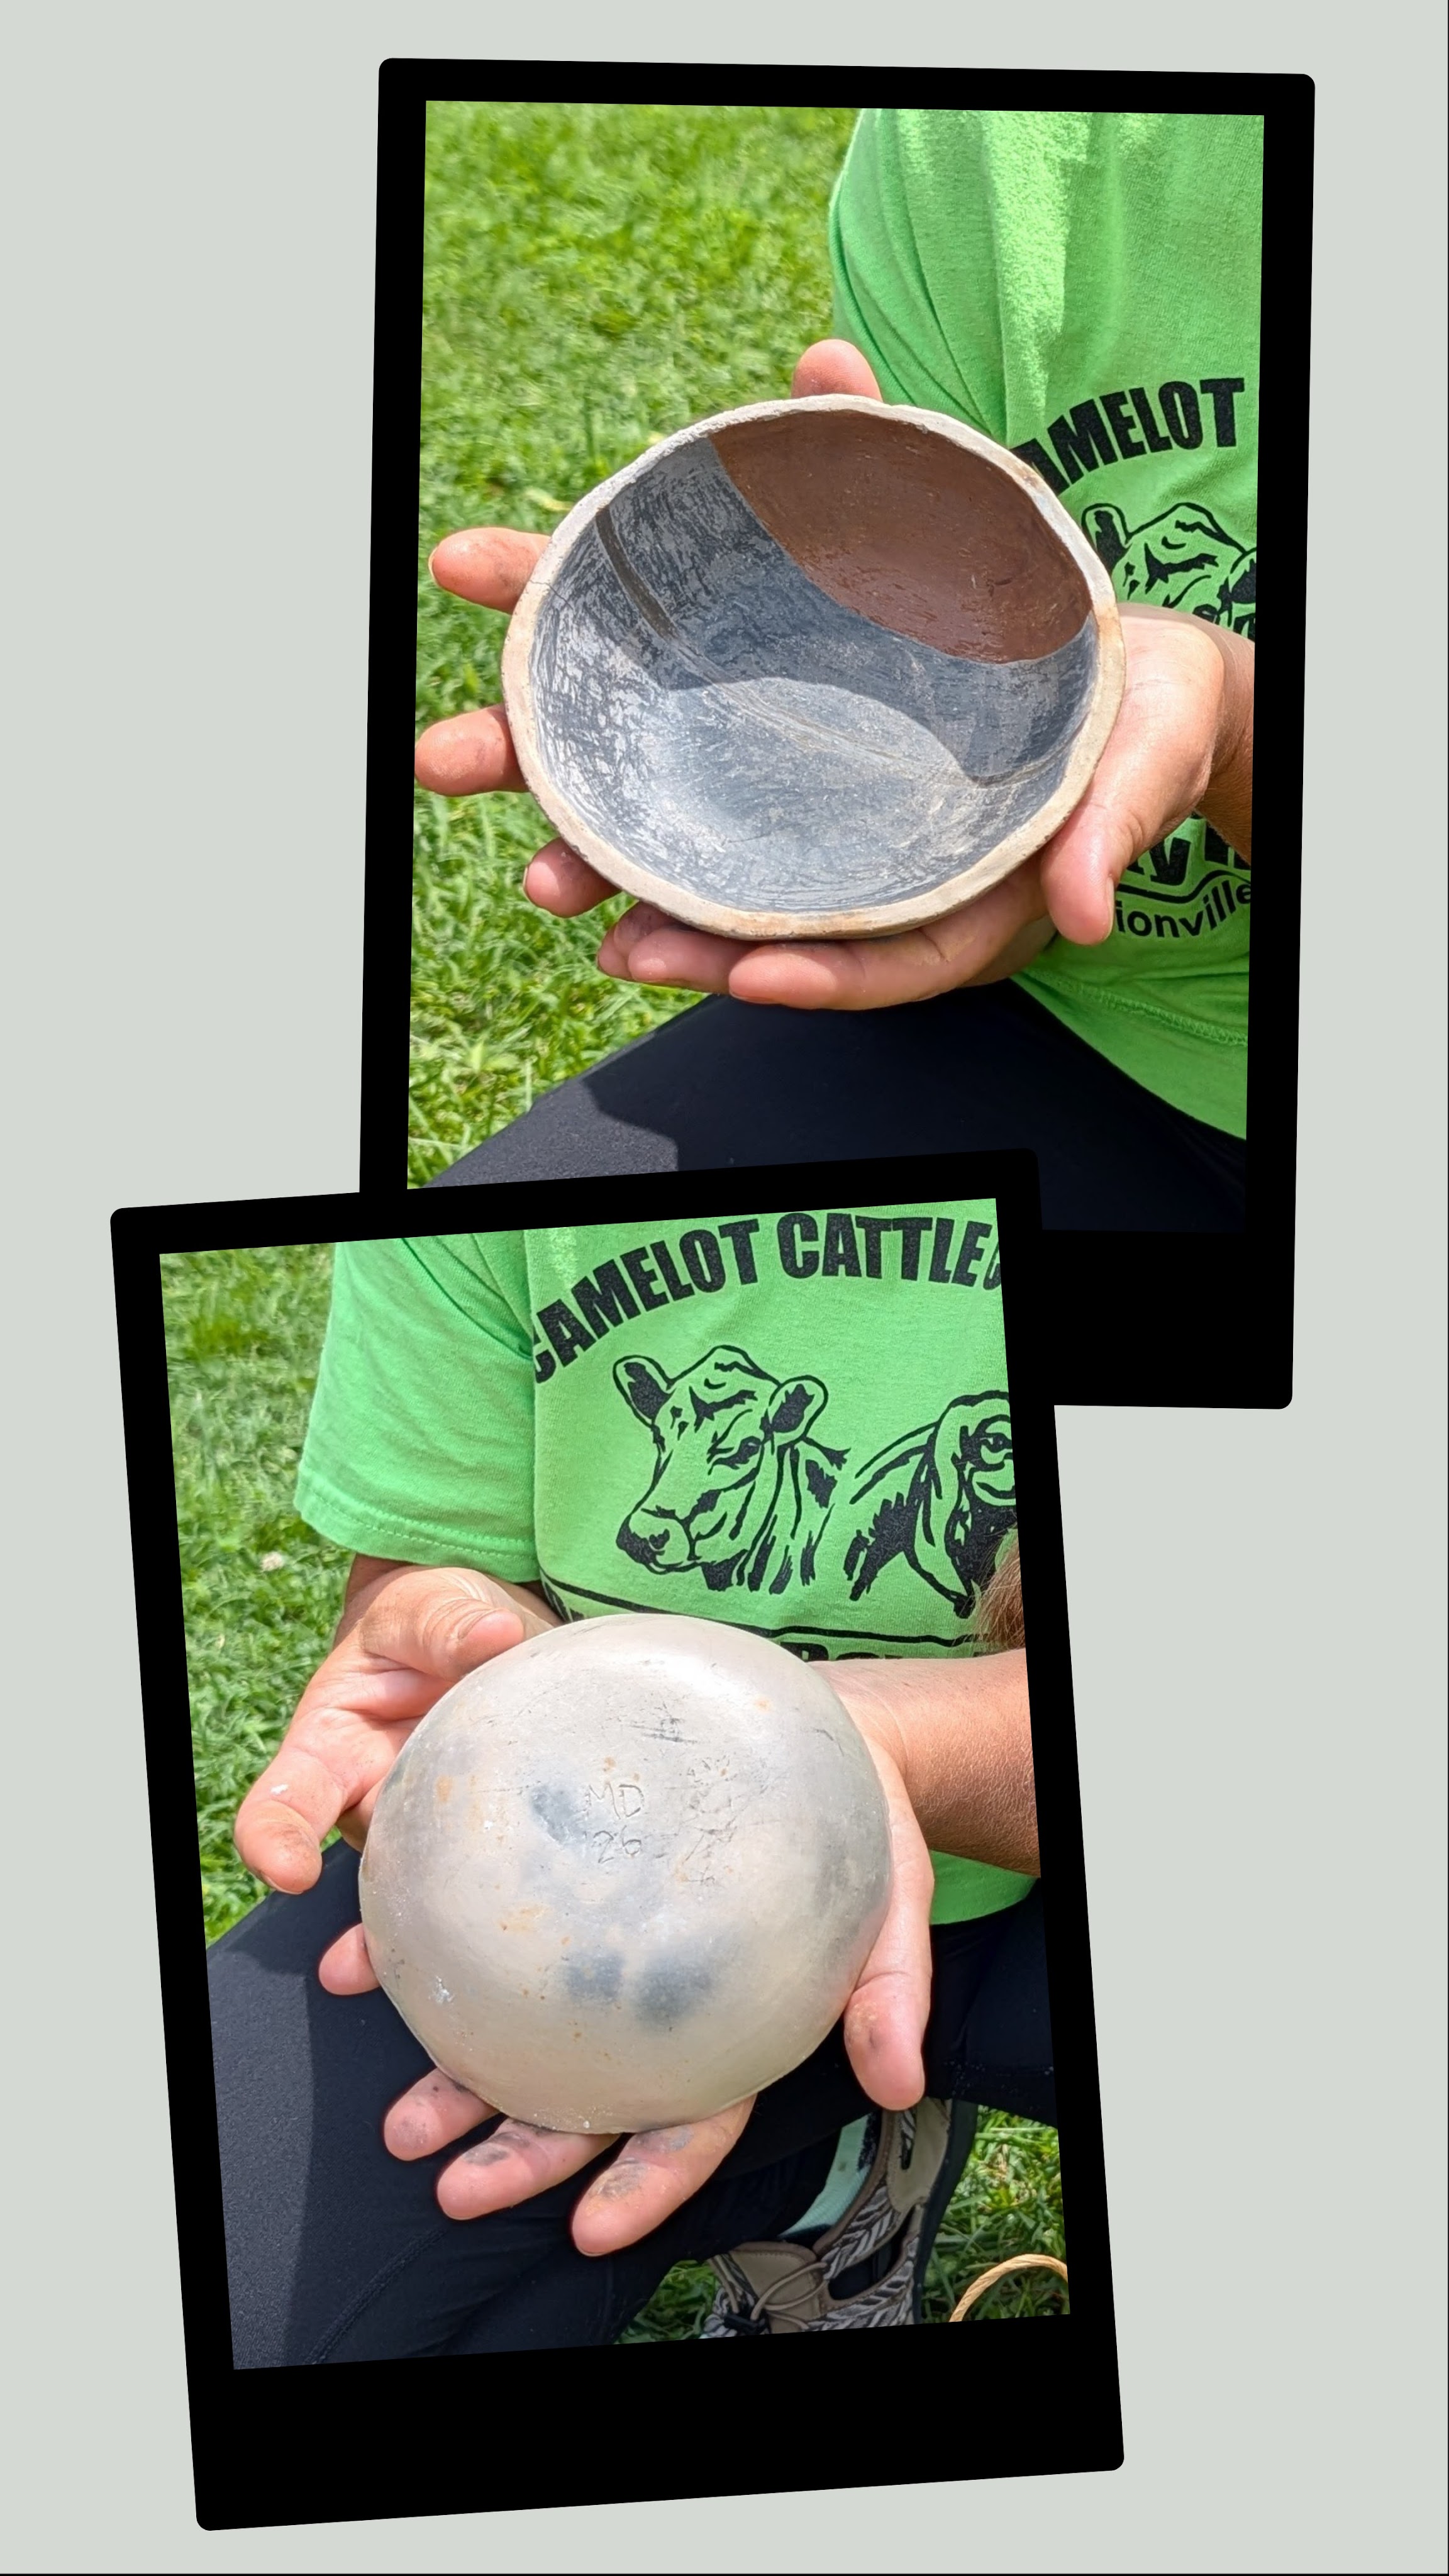
Unearthing: Once the fire has died down and things are cool enough to handle, carefully brush away the ashes to reveal your pottery. Because this method of firing is alive and unpredictable, the smoke and flames leave beautiful, unique patterns on the clay—giving each piece its own wild story. You can get some very unexpected results!
It is impossible to spend days washing rocks, sand, and organic matter out of raw clay without realizing the quiet lessons of faith woven into the work. In its initial state, wild clay is a mess. Raw clay filled with too much grit and debris can’t be used to make anything useful. It takes patience, work, and time to separate the pure clay from the grit. But when it’s processed, purified, and mixed with just the right ratio of temper and water, it can finally be shaped into something beautiful and useful. It’s a slow process, but the results are entirely worth the patience and work.
How often does the Lord do that exact same tedious work with us? He looks at our messy, unrefined lives and doesn’t discard us—He patiently purifies us, washing away the debris, tempering us until we are ready to be shaped into the vessel He intended for us to be.
By the time the pottery fire burns down and you are able to pull your pottery from the ashes, you may be tired and smell heavily of woodsmoke, but perhaps you will also carry a deeper reverence for the Creator, the ancient craftsmen who came before us, and a deeper kinship with those sharing the fire with you.
“But now, O Lord, you are our Father; we are the clay, and you are our potter; we are all the work of your hand.”
— Isaiah 64:8
Have you ever tried foraging for something completely unexpected? Or maybe there’s an ancient, hands-on skill you’ve been itching to learn with your kids? What’s your favorite way to slow down and connect with the old ways? Let me know in the comments!

Leave a comment and let me know what you think!